DummyMap is a simple location based application on IOS. It’s been designed to show location of 4 types of restaurant in Ha Noi. All data use in this project is no real. App’s designed to use collection view for presenting list restaurant data and use map view for presenting location on map. After complete project we will have a simple IOS application with 2 tabs and learn how to use collection view and map view to show data from server.
Getting Started
The app presents dummy restaurants location and information on feeds and map view. You can browse the restaurants on feeds list information and more visually with map view.
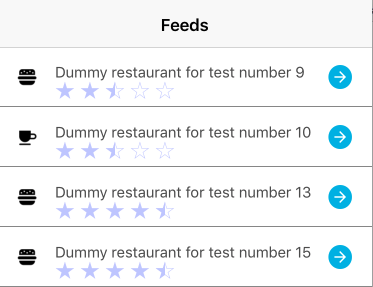
Feeds screen on portrait mode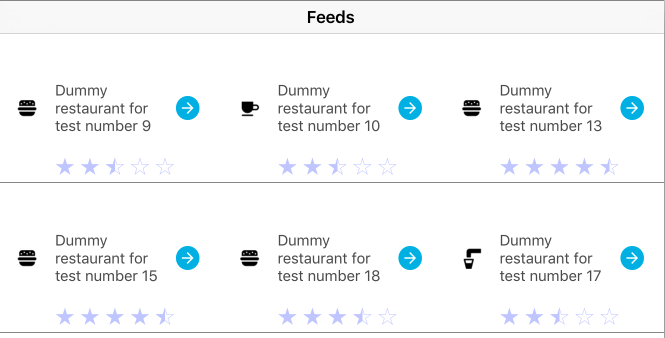
Feeds screen on landscape mode
The feeds screen is built using a UICollectionView with a custom flow layout. At the first sight, it looks like table view when device in portrait mode but when you rotate the device to landscape it will change the layout to 3 items per row because there are a lot of free space I don’t want to waste it.
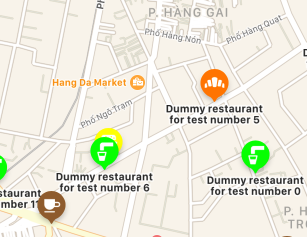
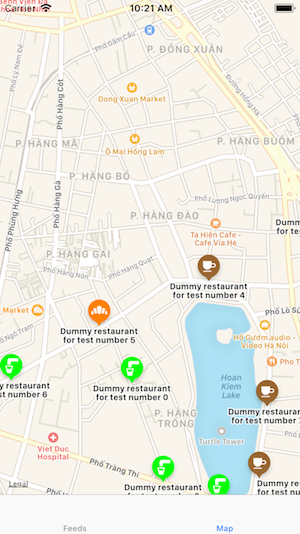
The map screen is built using a MKMapView. The restaurant is displayed using MKMarkerAnnotationView that displays a balloon-shaped maker at the designated location.
The data use in this project is dummy data from this api. After fetching from server, data will be saved to local disk by using Core data then bind to UI
The aims of this part are to load data from api, save it into data and bind to UI.
Introducing DummyMap
In the rest of this article, you are going to create cool location-based app called DummyMap. It will allow you to find variant of restaurants in Ha Noi by showing list of restaurant and location of them on map.
Let’s start. Open Xcode and go to File\New\Project… and select iOS\Application\Single View Application template.
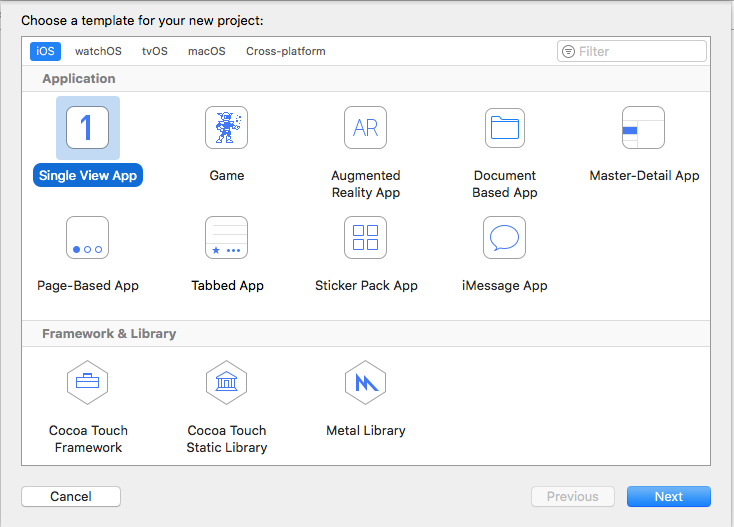
This temple will provide you with a single UIViewController and storyboard to start out with.
Click Next to fill out the information about the application. Set the Product Name to DummyMap, tick Use Core Data and language to Swift. Click Next to select the project location and then click Create
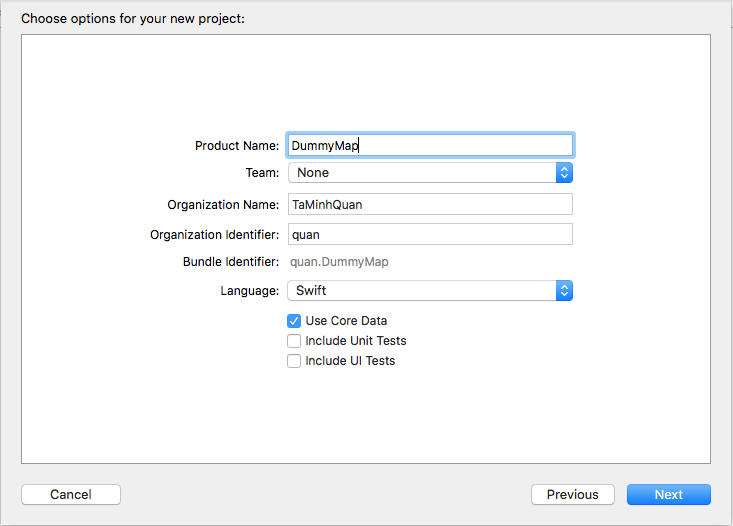
The view controller subclass and storyboard that come with the single view application template aren’t any use to you. You’re going to use UITabBarViewController to be main view. Delete ViewController.swift and remove empty view controller from Main.storyboard. Now you’re got a blank state .
Starting your feeds screen
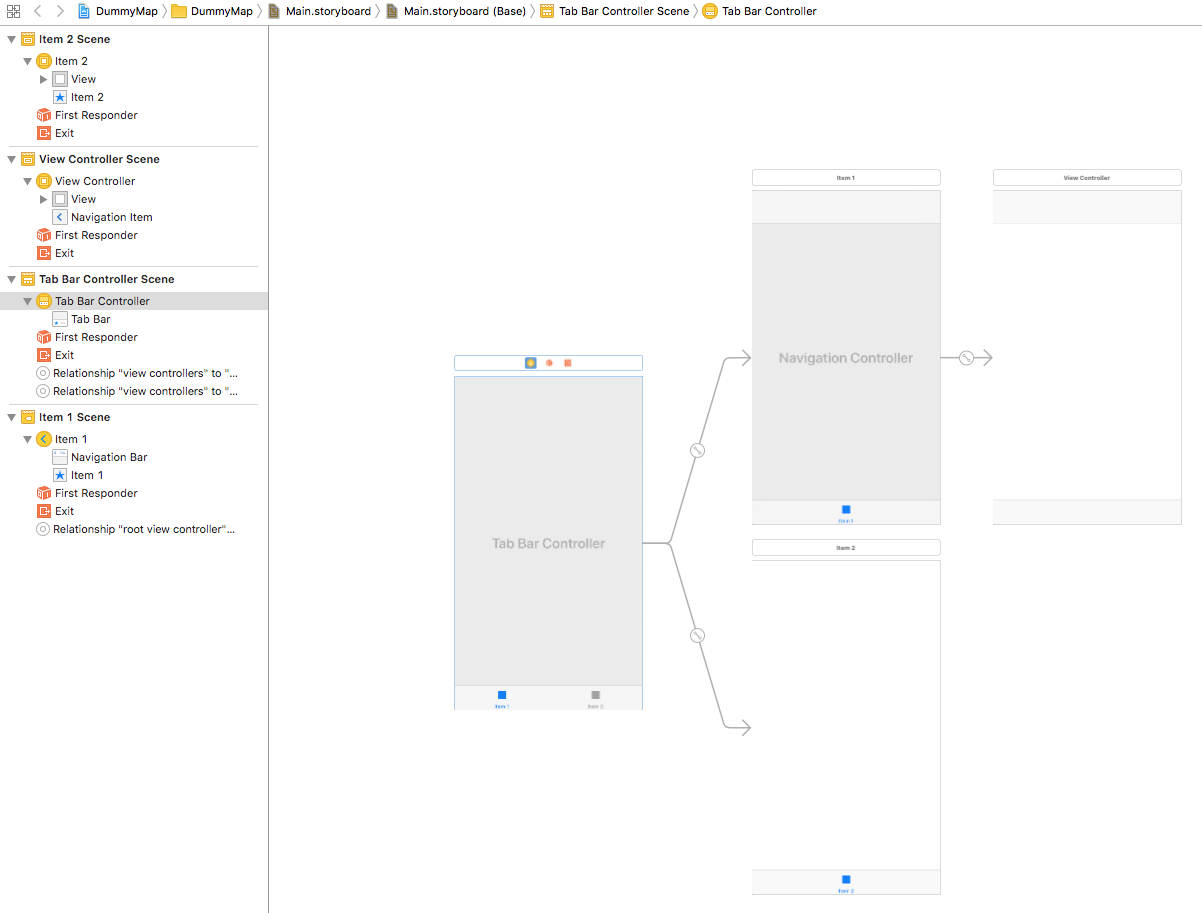
Open Main.storyboard and drag in a Tabbar View Controller. Now you have a UITabBarViewController and 2 view controllers scene. Select item 1 Scene in storyboard, go to Editor\Embed in\Navigation Controller to create a navigation controller and automatically set the view controller as the root.
You should now have a layout like this in the storyboard:
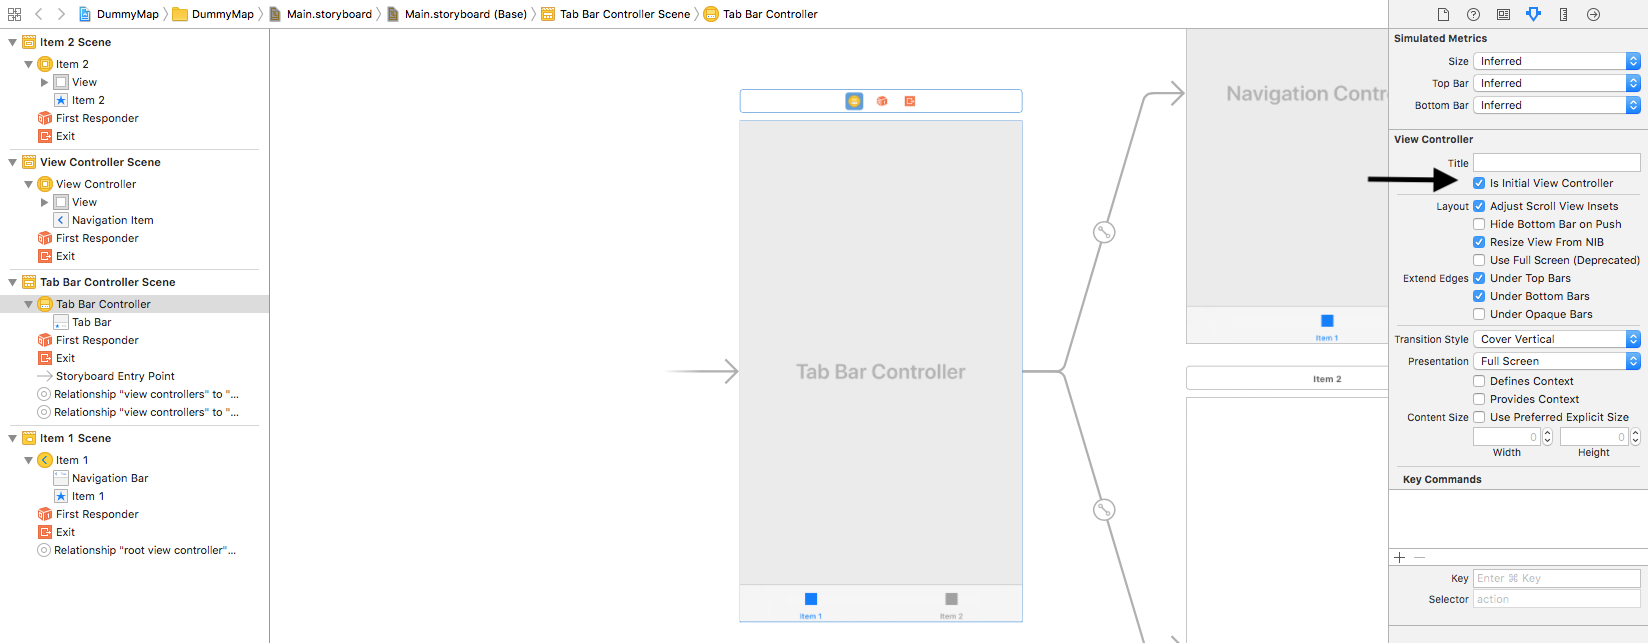
Next, select the Tabbar Controller you installed and make it the initial view controller in the Attributes Inspector:
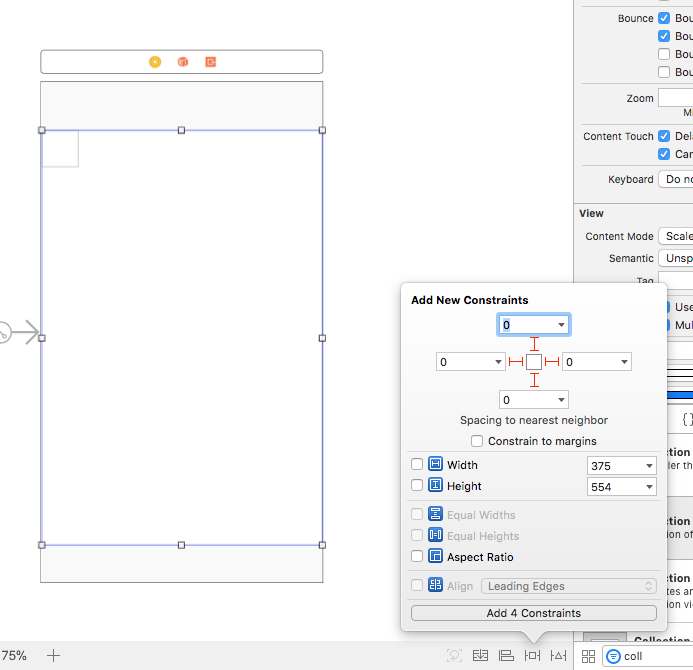
Drag in a collection view to the item 1 scene and set constraint for it. This will be where the list of restaurants are going to be shown.
Go to File\New\File…, choose iOS\Source\Cocoa Touch Class template and click Next. Name the new class FeedVC.swift, making it a subclass of UIViewController. The template provides you some basic function, you will add more code to implement UICollectionViewDelegate*, UICollectionViewDataSource, UICollectionViewDelegateFlowLayout**.
Go back to Main.storyboard, select the view controller scene item 1 and in the identity inspector, set Class to FeedVC.swift to mach your new class.

Next, control-drag from the collection view to the view controller and choose delegate and data source outlet:
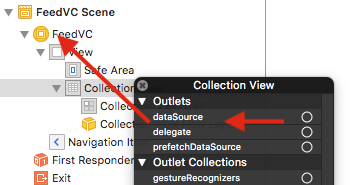
Finally, select Collection View Flow Layout object in the collection view and in size inspector set the Min Spacing to 0 For Cells , 0 For Lines.

Getting Dummy Restaurants
My JSON Server is a website allow you to create static json contents. It’s good for test projects like this and very easy to use.
In this project, you will use Alamofire library to fetch api. It is an HTTP networking library written in Swift.
Now, open FeedVC.swift and add following code to declare the url to fetch json data and import Alamofire library :
1 | import UIKit |
Next, add getRestaurantList() method to call Alamofire load json data from main url.
1 | func getRestaurantList() { |
Try to load by placing getRestaurantList() in viewDidLoad() template method, if you see the log success and json data , that mean you’ve completed this step and now ready to move on.
Modeling your data
Up to this point, you’ve been able to load json data, it’s time to save data into disk. In this section, you’ll covert json data into Core data objects.
The first step is to create a managed object model, which describes the way Core Data represents data on disk.
By default, Core Data uses a SQLite database as the persistent store, so you can think of the Data Model as the database schema.
Since you’ve elected to use Core Data, Xcode automatically created a Data Model file for you and named it DummyMap.xcdatamodeld.
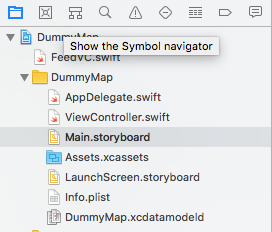
Open DummyMap.xcdatamodeld, click on Add Entity on the lower-left to create a new entity. Double-click the new entity and changes its name to Restaurant, like so:

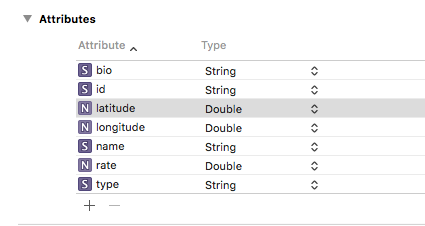
Next, select Restaurant on the left-hand side and click the plus sign (+) under Attributes. Set some new attributes like this :
Setting up Core Data Stack
The view controller template already provides you default Core Data Stack code in AppDelegate.swift
1 | // MARK: - Core Data stack |
In order to reuse code and separate Core Data code with app delegate, you’re going to create a new class named CoreDataStack
Go to File\New\File…, select iOS\Source\Swift File template and click Next. Name the file CoreDataStack and click Create to save the file.
Clean up the default Core data stack in AppDelegate.swift and go to the newly created CoreDataStack.swift. Start by replacing the contents of the file with the following:1
2
3
4
5
6
7
8
9
10
11
12
13
14
15
16
17
18
19
20
21
22
23
24
25
26
27
28
29
30
31
32
33
34
35
36import Foundation
import CoreData
class CoreDataStack {
private let modelName: String
init(modelName: String) {
self.modelName = modelName
}
lazy var managedContext: NSManagedObjectContext = {
return self.storeContainer.viewContext
}()
private lazy var storeContainer: NSPersistentContainer = {
let container = NSPersistentContainer(name: self.modelName)
container.loadPersistentStores { (storeDescription, error) in
if let error = error as NSError? {
print("Unresolved error \(error), \(error.userInfo)")
}
}
return container
}()
func saveContext () {
guard managedContext.hasChanges else { return }
do {
try managedContext.save()
} catch let error as NSError {
print("Unresolved error \(error), \(error.userInfo)")
}
}
}
Next, open AppDelegate.swift, below window, add a propery to hold the Core Data stack:
1 | lazy var coreDataStack = CoreDataStack(modelName: "DummyMap") |
You initialize the Core Data stack object as a lazy variable on the application delegate. This mean the stack won’t be set up until the first time you access the property.
Still in AppDelegate.swift, replace applicationDidEnterBackground( application: UIApplication) and applicationWillTerminate( application: UIApplication) with the following:
1 | func applicationDidEnterBackground(_ application: UIApplication) { |
Adding managed object subclasses
Go to Editor\Create NSManagedObject Subclass… and choose the DummyMap model, and Restaurant entity. Click Create on the next screen to create the files.
Xcode generated 2 Swift files for you, one called Restaurant+CoreDataClass.swift and a second called Restaurant+CoreDataProperties.swift.
Open Restaurant+CoreDataClass.swift. It should look like this:
1 | import Foundation |
Next, open Restaurant+CoreDataProperties.swift. It should look like this:1
2
3
4
5
6
7
8
9
10
11
12
13
14
15
16
17
18
19import Foundation
import CoreData
extension Restaurant {
public class func fetchRequest() -> NSFetchRequest<Restaurant> {
return NSFetchRequest<Restaurant>(entityName: "Restaurant")
}
public var id: String?
public var name: String?
public var bio: String?
public var type: String?
public var rate: Double
public var latitude: Double
public var longitude: Double
}
Saving into Core data
Open FeedVC.swift and add following below import UIKit
1 | import CoreData |
Next, add the following below the last IBOutlet property
1 | var managedContext: NSManagedObjectContext! |
Set the managedContext property in viewDidLoad(). Add the following below the super call
1 | let appDelegate = UIApplication.shared.delegate as! AppDelegate |
In previous section, you’ve been able to download json data from Api. The json data is an array of dictionaries. You will start saving process by converting a item dictionary to Core Data Object. Add following method to FeedVC.swift
1 | func insertNewShopEntity(dict: [String:Any]) { |
Next, iterate all json array to save data into Core Data by adding following
1 | func parseJsonData(input: [[String:Any]]) { |
Now, you are able to parse json data into Core Data. It’s time to add this method to Api caller . Your Api call should look like this
1 | func getRestaurantList() { |
The final step is fetching data from Core Data. Firstly, add feedData property below managedContext property.
1 | var feedData: [Restaurant] = [] |
Secondly, make a fetch request to get data from Core Data and save it into feedData property by adding following method
1 | func fetchRestaurantList() { |
Place fetchRestaurantList() in viewDidLoad() and restart app. If you can see the log data, you are complete this section.
Feeding the UICollectionView
Similar to table view, when you use a collection view you have to set a data source and a delegate as well. Their roles are the following:
- The data source (UICollectionViewDataSource) returns information about the number of items in the collection view and their views.
- The delegate (UICollectionViewDelegate) is notified when events happen such as cells being selected, highlighted, or removed.
- The flow layout object delegate (UICollectionViewDelegateFlowLayout) allows you to tweak the behaviour of the layout, configuring things like the cell spacing, scroll direction, and more.
In this section, you’re going to implement the required UICollectionViewDataSource and UICollectionViewDelegateFlowLayout methods on your view controller.
UICollectionViewDataSource
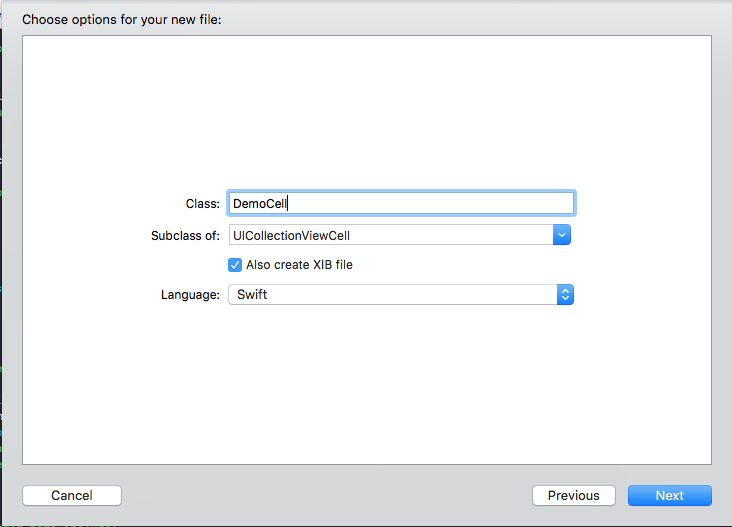
Firstly, add a UICollectionViewCell subclass to present restaurant data. Go to File\New\File…, choose iOS\Source\Cocoa Touch Class template and click Next. Name the new class DemoCell.swift, making it a subclass of UICollectionViewCell, check Also create XIB file and then click Next.
Open DemoCell.xib, drag-drop following control to collection view cell interface builder interface
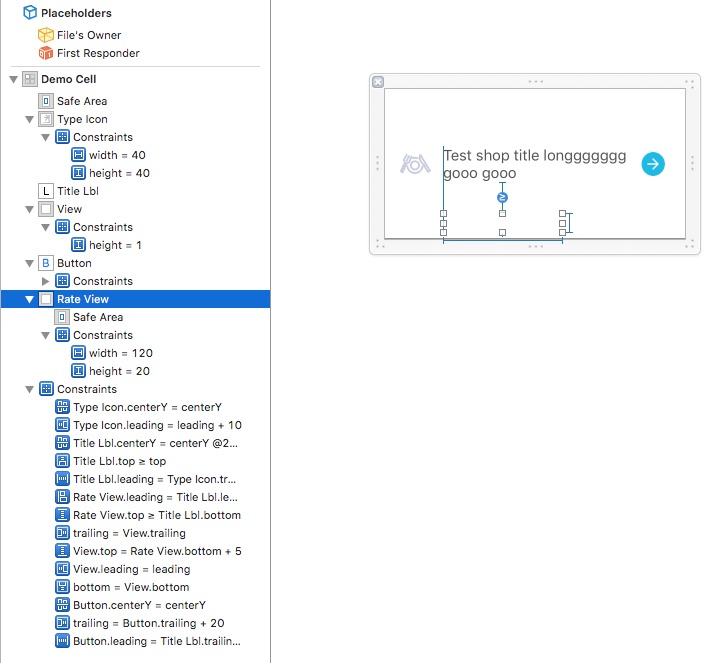
These controls are pretty straightforward:
- Type icon is a UIImageView. It show the type icon for each restaurant and has fix size 40x40.
- Title Lbl is a UILabel. It show the restaurant’s name.
- A view with height 1. It’s separate line between lines in collection view.
- A button with fix size 24x24. It works like indicator view in table view.
- Rate view is subclass of CosmosView. It’s a star rating control lib written in Swift.
Open DemoCell.swift , control-drag outlet to this file and add following methods. Your DemoCell.swift should look like this:
1 | import UIKit |
Open FeedVC.swift, add the following code into viewDidLoad() to register the new collection view cell:
1 | feedCollectionView.register(DemoCell.nib, forCellWithReuseIdentifier: DemoCell.identifier) |
Next, add the following extension to the file for the UICollectionViewDataSource protocol:
1 | extension FeedVC: UICollectionViewDataSource { |
UICollectionViewDelegateFlowLayout
In this project, the collection view layout will be changed depend on device’s orientation. Most of layout parameters have been configured in storyboard, only size of item is depend on device’s width. Add the UICollectionViewDelegateFlowLayout extension to allow the view controller to conform to the flow layout delegate protocol:
1 | extension FeedVC: UICollectionViewDelegateFlowLayout { |
This method is pretty straightforward. In portrait mode, the collection view cell has width equal to screen’s width, and in landscape mode, the collection view will show 3 cells per row with the grid-view style.
Add, following code under set feedData line in fetchRestaurantList():
1 | feedCollectionView.reloadData() |
Then, add fetchRestaurantList() to the end of parseJsonData(input: [[String:Any]]) to automatically load data when paring data successful. Add following method to FeedVC class to invalid layout when device rotate:
1 | override func viewWillTransition(to size: CGSize, with coordinator: UIViewControllerTransitionCoordinator) { |
Build and run project, you should see the result like this:

Feeds screen on portrait mode
Feeds screen on landscape mode
Detail Restaurant Screen
To complete the Feed tab, you’re going to add the final piece of Feed tab. Go to File\New\File…, choose iOS\Source\Cocoa Touch Class template and click Next. Name the new class RestaurantDetailVC.swift, making it a subclass of UIViewController. Then open Main.storyboard, from Object library drag-drop a View Controller object to storyboard and open Identify inspector set Custom class to RestaurantDetailVC. Open RestaurantDetailVC.swift and add following to class:
1 | import UIKit |
Next, prepare the view structure like following in storyboard:
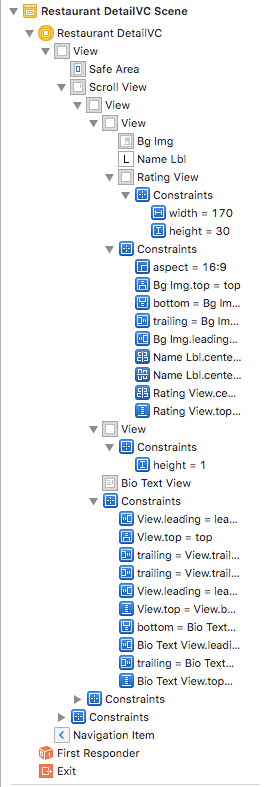
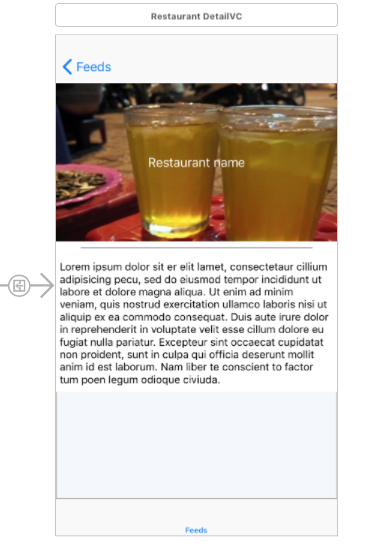
The view in storyboard should look like this:
Next, control-drag from FeedVC scene to RestaurantDetailVC scene to create a segue. Select this segue and open Attributes inspector set Identifier to showDetail. Open FeedVC.swift and add following extension to class for opening RestaurantDetailVC scene when you select collectionview cell:
1 | extension FeedVC: UICollectionViewDelegate { |
You get the restaurant’s data by index path and pass it into sender parameter. Then , you add the following method to class to finish
1 | override func prepare(for segue: UIStoryboardSegue, sender: Any?) { |
Buid and run project, try to tap 1 collectionview cell. It should push RestaurantDetailVC scene. Now you have completed the first tab of this application, it’s time to move on second tab.
Starting your Map screen
In this project, MapKit is going to be used to display maps, plot locations of restaurants. Now let’s get start.
Open Main.storyboard, select item 2 view controller of main tabbar controller. From the Object library, drag a MapKit View into the scene and add constraints for it:
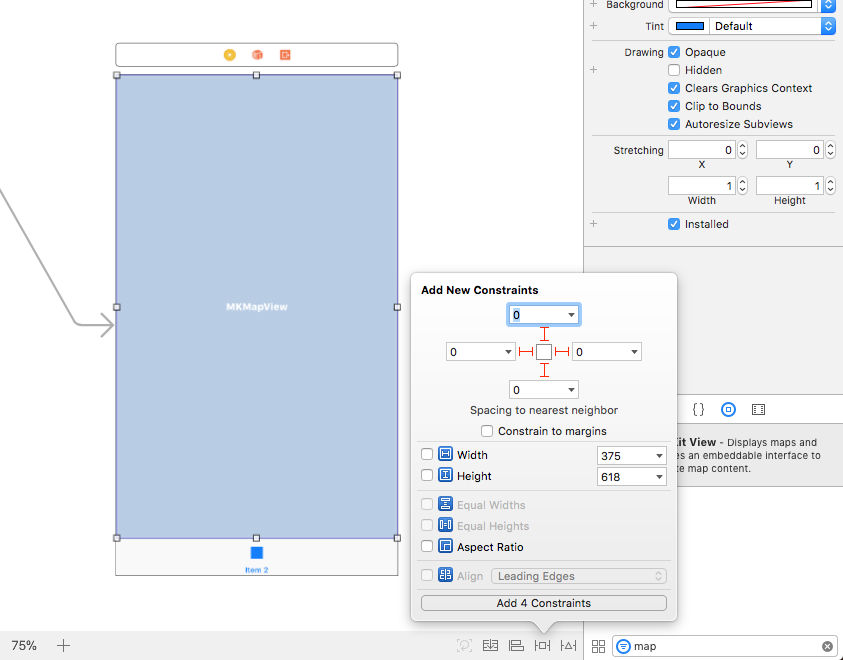
Go to File\New\File…, choose iOS\Source\Cocoa Touch Class template and click Next. Name the new class MapVC.swift, making it a subclass of UIViewController. Set item 2 scene Custom class to MapVC in Identify inspector.
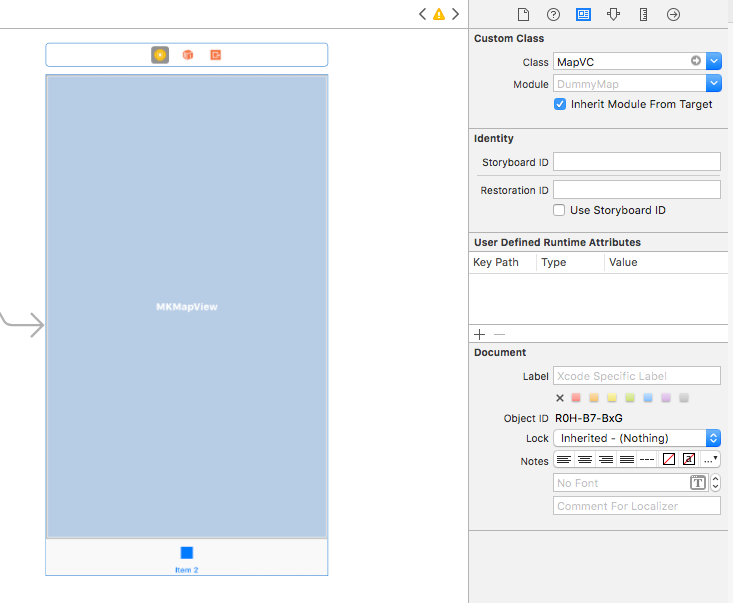
Next, add this line to MapVC.swift, just below the import UIKit statement:
1 | import MapKit |
Build and run your project, you’ll have a fully zoomable and pannable map showing the continent of your current location, using Apple Maps.
To control the map view, you must create an outlet for it in MapVC.swift.
In the storyboard, open the assistant editor. It should display MapVC.swift.
To create the outlet, click the Map View in Main.storyboard, and control-drag from it into space just inside the MapVC.swift:
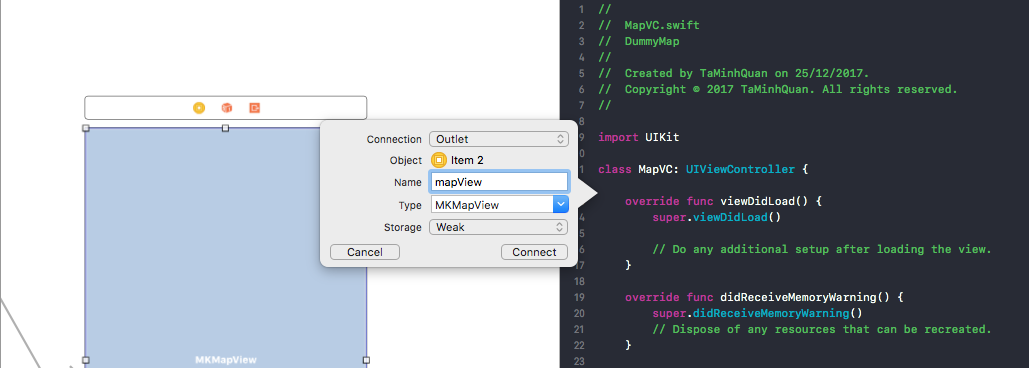
Initialization location
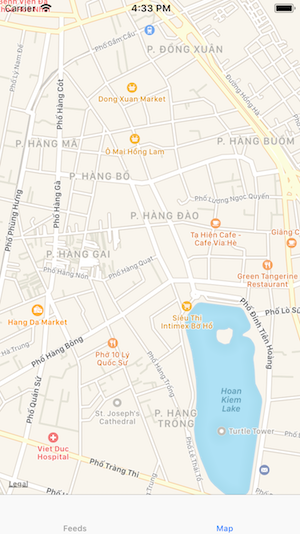
The dummy data return from API are some fake locations around Hoan Kiem Lake, Ha Noi, Viet Nam. So open MapVC.swift, add following below the map view outlet*:
1 | let initialLocation = CLLocation(latitude: 21.033333, longitude: 105.849998) |
You’ll use this to set the starting coordinates of the map view to a point in Hoan Kiem Lake.
When telling the map what to display, giving a latitude and longitude is enough to center the map, but you must also specify the rectangular region to display, to get a correct zoom level.
Add the following constraint below the initialLocation declare:
1 | let regionRadius: CLLocationDistance = 1000 |
Next, add helper method to the class and place it into viewDidLoad():
1 | func centerMapOnLocation(location: CLLocation) { |
Build and run the app, you’ll see the Hoan Kiem Lake.
The Map Annotation Class
First, create an MapAnnotation class. Go to File\New\File, choose iOS\Source\Swift File, and click Next. Set the Save As field to MapAnnotation.swift and click Next.
Open MapAnnotation.swift in the editor and add the following:
1 | import UIKit |
To adopt the MKAnnotation protocol, MapAnnotation must subclass NSObject, because MKAnnotation is an NSObjectProtocol.
The MKAnnotation protocol requires the coordinate property. 2 optical properties title and subtitle use to display name and description of the.
The type property determines type of the restaurant and from it you can get tint color and icon image via makerTintColor and image for each type of restaurants.
The mapItem() fuction returns a MKMapItem*. Here you create a MKMapItem from an MKPlacemark. The Maps app is able to read this MKMapItem and display the right thing. You will find out later in this tutorial.
The Map Maker View
In this project, the restaurant will be displayed on map by a balloon-shaped maker at the designated location. With MKMarkerAnnotationView, you can complete this specification easily. Go to File\New\File, choose iOS\Source\Swift File, and click Next. Set the Save As field to MapMakerView.swift and click Next.
Open MapMakerView.swift in the editor and add the following:
1 | import UIKit |
To configure the MKMarkerAnnotationView, you have to override setter of annotation property.
Finally, add the following method to register the MapMakerView view in viewDidLoad():
1 | mapView.register(MapMakerView.self, forAnnotationViewWithReuseIdentifier: MKMapViewDefaultAnnotationViewReuseIdentifier) |
Also, add this following extension to implementation map view delegate:
1 | extension MapVC: MKMapViewDelegate { |
This method allows open the restaurant’s location on maps app.
Parsing Core Data object into MapAnnotation object
Now you have done setup view for show map annotation on the map, it’s time to parse the dataset into array of MapAnnotation objects. Then you’ll add them as annotations to the map view, to display all restaurants located in the current map region.
Open MapVC.swift, add 2 following properties to the class to declare variable to store the MapAnnotation object and core data context:
1 | var annotationList: [MapAnnotation] = [] |
Next, add a fetch request to get the dataset from Core data then parsing them into array of MapAnnotation object. Add following helper method to class:
1 | func fetchAnnotation() { |
Finally, add this code into viewWillAppear(_ animated: Bool) method:
1 | if annotationList.isEmpty { |
It will check if annotations list is empty, it’ll fetch data from Core Data and add the MapAnnotation to the map view. Build and run app, it should look like this:
Conclusions
In this report, a simple location-based application has been completed. Now you know the basics of using Core Data, MapKit, Collection View to present and store data. Application can work smoothly now but we can do a lot of improvement to increase performance.
Here is the final project with all of the code you’re developed in this tutorial.

