
This article demonstrates using gRPC technology in microservices architecture. The project show the new features of gRPC and apply it into a simple microservices project. You can have an overview of this technology and how to use it in real world project.
Getting Started
gRPC is an open source remote procedure call (RPC) system initially developed at Google. It uses HTTP/2 for transport, Protocol Buffers as the interface description language, and provides features such as authentication, bidirectional streaming and flow control, blocking or nonblocking bindings, and cancellation and timeouts. It generates cross-platform client and server bindings for many languages.
Like previous article, you’re going to use Docker to build microservices. You should have the basic understanding some basic commands of Docker before getting start.
The following sequence diagram show the final operations of the project:
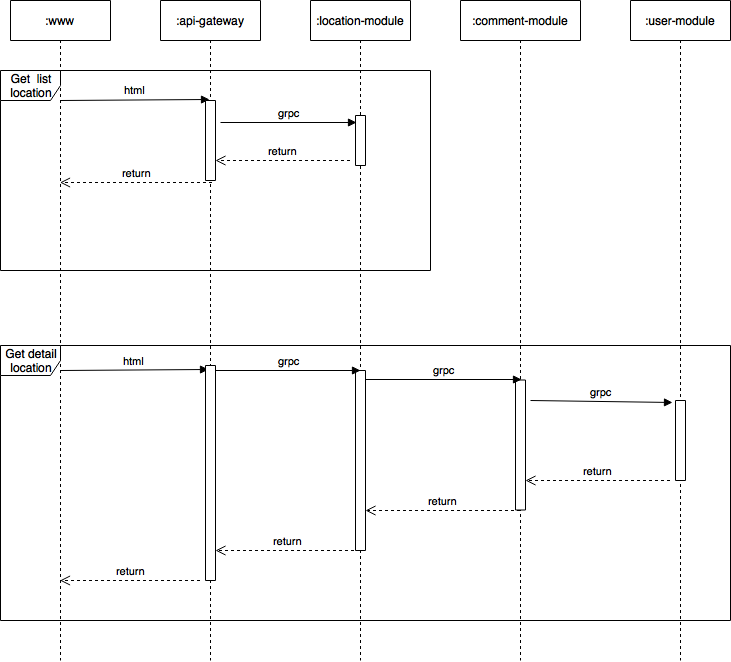
The aims of this project are to setup a simple microservices application and to use gRPC for communicating messages between services.
Setup container communication
The first step for setting up project environment is creating a docker network. It allows containers communicate within it. Bridge networks offer the easiest solution to create your own Docker network. Open Terminal and type following command:
1 | $ docker network create -d bridge qNet |
Setup Users module
In this section, you’re going to create a docker container for users data management. First, you need generate protobuf files by compiling the users.proto file. The content for users.proto is shown below.
1 | syntax = "proto3"; |
By using the grpcio-tools to compile the users.proto file, you can get the users_pb2.py and users_pb2_grpc.py two files.
The compile command is:
1 | $ python -m grpc_tools.protoc -I. --python_out=. --grpc_python_out=. users.proto |
Then you create the server using the grpc generated python file.
The server.py file:
1 | from concurrent import futures |
In this project, the service file is very simple , it just get data from json file and pass it to grpc message.
Next, you need to create Dockerfile to build the docker container for users module. The content of Dockerfile is:
1 | FROM grpc/python:1.4 |
Run following command to build the docker image:
1 | $ docker build -t uses-module ./users |
Then run the docker container by using this command:
1 | $ docker run -d -it --name users-module --net qNet -v $(pwd)/users:/code users-module |
Setup comments module
This module uses for comments data management. Similar to users module, you create the comments.proto file for it. The content of comments.proto file is:
1 | syntax = "proto3"; |
Then, you generate comments_pb2.py and comments_pb2_grpc.py using this command:
1 | $ python -m grpc_tools.protoc -I. --python_out=. --grpc_python_out=. comments.proto |
In this section, you need to get data from users module so copy users_pb2.py and users_pb2_grpc.py from previous part to /comments directory.
Next, create the service file. The content of server.py is:
1 | from concurrent import futures |
The comments service get data content from comments.json file and request user information via gRPC message.
Next, you need to create Dockerfile to build the docker container for comments module. The content of Dockerfile is:
1 | FROM grpc/python:1.4 |
Run following command to build the docker image:
1 | $ docker build -t uses-module ./comments |
Then run the docker container by using this command:
1 | $ docker run -d -it --name comments-module --net qNet -v $(pwd)/comments:/code comments-module |
Setup Locations module
Locations module uses for locations data management. First, you need to define proto file for this part. The content of locations.proto is:
1 | syntax = "proto3"; |
You can see the difference in this proto file is import “google/api/annotations.proto”; and the options in services code. You can find more useful information about it here. This options are going to use for generating reverse proxy code and swagger definition later in this article.
Then, you generate locations_pb2.py and locations_pb2_grpc.py using this command:
1 | $ python -m grpc_tools.protoc -I. --python_out=. --grpc_python_out=. locations.proto |
Copy comments_pb2.py and comments_pb2_grpc.py to /locations directory for communicating with comments module.
Next, you need create service file. The content of server.py file is:
1 | from concurrent import futures |
The comments service get data content from locations.json file and request comment information via gRPC message.
Next, you need to create Dockerfile to build the docker container for location module. The content of Dockerfile is:
1 | FROM grpc/python:1.4 |
Run following command to build the docker image:
1 | $ docker build -t locations-module ./locations |
Then run the docker container by using this command:
1 | $ docker run -d -it --name locations-module --net qNet -v $(pwd)/locations:/code locations-module |
Now, the our backend site of application has been finished. You will create client site to test it in next section.
Setup the client side
Role of client is sending request and displaying the result. Firstly, copy the locations_pb2.py and locations_pb2_grpc.py to /location-clients directory. Then, create the service file, the content of client.py is:
1 | from __future__ import print_function |
Now, create the Dockerfile to build docker image, the content of it is:
1 | FROM grpc/python:1.4 |
Run following command to build the docker image:
1 | $ docker build -t location-client-module ./locations-clients |
Then run the docker container by using this command:
1 | $ docker run -d -it --name location-client-module --net qNet -v $(pwd)/locations-clients:/code location-client-module |
Final step is testing, run this command to access to location-client-module module ‘s command prompt:
1 | $ docker exec -it location-client-module bash |
Run the client.py inside this container, you should see the following output:
1 | # python client.py |
At this point, you have completed all the microservices application. The next section is discussing advance topic about generating reverse proxy and swagger definition
Set up API gateway (Experimental)
grpc-gateway is a plugin of protoc.It reads gRPC service definition, and generates a reverse-proxy server which translates a RESTful JSON API into gRPC. This server is generated according to custom options in your gRPC definition.
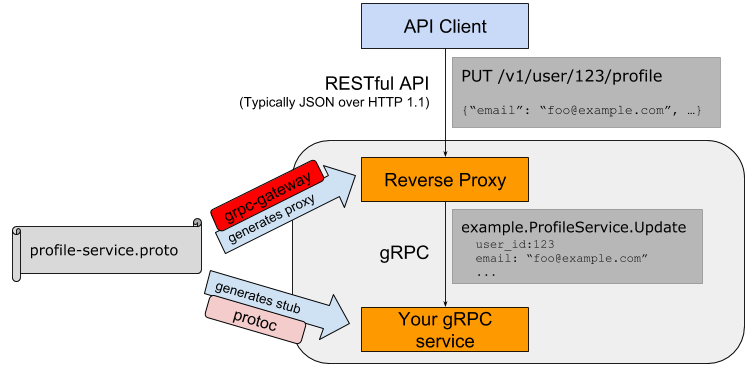
You can find more information about it here
In /grpc-gateway directory is the reverse proxy container code. You can build it by running this command:
1 | $ docker build -t locations-gateway ./grpc-gateway |
Run this container by run this command:
1 | $ docker run --name locations-gateway --net qNet -p 8080:80 locations-gateway --backend=locations-module:22222 |
Testing the proxy container, by running this commad to get the json data of location with id 3:
1 | $ curl http://localhost:8080/locations/3 |
You can also convert the swagger definition file to other programming languages like swift, objC … It’s my most interesting feature of grpc-gateway plugin. You can find the swagger definition file in /grpc-gateway/src/gen/pb-go/locations.swagger.json and use swagger editor to convert.
You can check out my IOS swift client for this project.
Conclusions
In this article, a microservice application has been constructed using gRPC to communicating. During process you have review the basic feature of gRPC by real example.
Final code for this project can find here